How to Maintain Insulated Siding
How to maintain insulated siding is a crucial aspect of homeownership, impacting both aesthetics and longevity. Understanding the nuances of different siding materials—from durable vinyl to elegant fiber cement—is key to effective upkeep. This guide delves into regular cleaning, inspection techniques, and addressing common issues, ensuring your home’s exterior remains beautiful and protected for years to come. We’ll explore preventative measures, repair strategies, and long-term care to maximize the lifespan of your investment.
Proper maintenance not only enhances curb appeal but also prevents costly repairs down the line. By following the advice presented here, you can significantly extend the life of your insulated siding and protect your home from the elements. This comprehensive guide will equip you with the knowledge and practical steps needed to keep your siding in top condition.
Understanding Insulated Siding Materials
Choosing the right insulated siding material is crucial for both the aesthetic appeal and long-term performance of your home. Different materials offer varying levels of insulation, durability, and maintenance requirements. Understanding these differences will help you make an informed decision. This section details the properties of common insulated siding materials to aid in your selection process.
Insulated Vinyl Siding
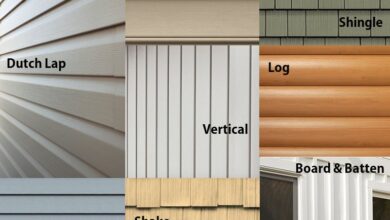
Vinyl siding, often infused with foam insulation, offers a balance of affordability and ease of maintenance. Its lightweight nature makes installation relatively straightforward. The smooth surface resists dirt and grime, requiring minimal cleaning, typically just an occasional rinse with water and a soft brush. However, vinyl can be susceptible to damage from impacts, and its color can fade over time, particularly with prolonged sun exposure. Repairing damaged sections can be relatively inexpensive, but replacing large areas might become costly.
Insulated Fiber Cement Siding
Fiber cement siding, a composite of cement, cellulose fibers, and other additives, provides superior durability and fire resistance compared to vinyl. It’s also less susceptible to fading and impact damage. While more expensive initially, its long lifespan often offsets the higher upfront cost. Maintenance involves periodic cleaning to remove dirt and algae, potentially requiring a pressure washer for stubborn stains. Repairing minor damage is possible, but major repairs can be more involved and costly than vinyl repairs.
Insulated Foam Siding
Foam siding, often polyurethane or polyisocyanurate, offers exceptional insulation properties, leading to significant energy savings. It’s lightweight and easy to install. However, it’s less durable than vinyl or fiber cement, being more susceptible to dents and scratches. Its surface can also be more prone to absorbing dirt and requiring more frequent cleaning. While the material itself is relatively inexpensive, the potential for damage and the need for more frequent maintenance should be considered.
Comparison of Insulated Siding Materials
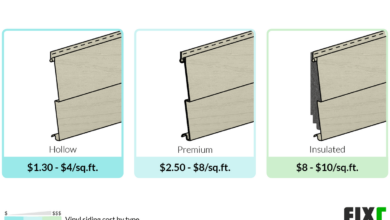
| Material | Lifespan (Years) | Cost (Approximate Range) | Maintenance Requirements |
|---|---|---|---|
| Vinyl | 20-40 | $5-$15 per square foot | Occasional cleaning with water and brush; minor repairs relatively inexpensive. |
| Fiber Cement | 50-80 | $10-$25 per square foot | Periodic cleaning, potentially with pressure washer; repairs can be more involved and costly. |
| Foam | 15-30 | $3-$10 per square foot | More frequent cleaning; susceptible to damage, requiring more frequent repairs. |
Regular Cleaning and Inspection
Maintaining the pristine condition and longevity of your insulated siding requires a proactive approach encompassing regular cleaning and diligent inspections. Neglecting these crucial aspects can lead to premature deterioration, costly repairs, and a diminished aesthetic appeal. A well-maintained siding system not only enhances your home’s curb appeal but also protects the underlying structure from the elements.
Regular cleaning removes dirt, grime, and pollutants that can accumulate over time and potentially damage the siding’s protective layers. Consistent inspections allow for early detection of minor issues, preventing them from escalating into major problems. This preventative approach significantly extends the lifespan of your siding investment.
Cleaning Insulated Siding
A routine cleaning schedule for insulated siding depends on several factors, including climate, surrounding environment (e.g., proximity to trees or busy roads), and the siding material itself. However, a general guideline would be to clean your siding at least twice a year – once in spring and again in autumn. More frequent cleaning may be necessary in areas with heavy pollution or significant tree cover.
For most types of insulated siding, a gentle cleaning method is sufficient. Begin by rinsing the siding with a garden hose to remove loose dirt and debris. For tougher grime, a solution of mild detergent (like dish soap) and water can be used. Apply the solution with a soft-bristled brush or sponge, avoiding harsh scrubbing that could damage the siding’s surface. Rinse thoroughly afterward to remove all traces of soap. Pressure washing should be avoided, as the high-pressure water stream can damage the siding or compromise its insulation properties. For stubborn stains, consider using a specialized siding cleaner appropriate for your siding material. Always test any cleaning solution on a small, inconspicuous area first to ensure it doesn’t damage the finish.
Identifying Early Signs of Damage
Regular visual inspections are vital for identifying early signs of damage or deterioration. These inspections should be part of your seasonal cleaning routine. Look for signs such as cracks, chips, dents, or loose panels. Pay close attention to areas that are prone to damage, such as corners, edges, and areas exposed to direct sunlight or moisture. Check for any signs of water damage, such as discoloration, swelling, or mold growth. Also, inspect for insect infestation, which can cause significant structural damage if left untreated. The presence of gaps or separations between panels can indicate potential issues with the installation or structural integrity of the siding. Any signs of warping or buckling should be addressed immediately.
Importance of Regular Inspections and Preventative Maintenance
Regular inspections and preventative maintenance are essential for extending the lifespan of your insulated siding and preventing costly repairs. Early detection of minor issues allows for timely intervention, often involving simple repairs or cleaning, preventing further damage and preserving the siding’s integrity. Preventative maintenance also helps to maintain the home’s energy efficiency, as damaged siding can compromise the insulation properties and lead to higher energy bills. A well-maintained siding system contributes significantly to the overall value and curb appeal of your property.
Yearly Siding Inspection Checklist
Regular inspections are key to preventative maintenance. Here’s a checklist for a thorough yearly inspection:
- Inspect all siding panels for cracks, chips, dents, or other signs of physical damage.
- Check for any signs of water damage, such as discoloration, swelling, or mold growth.
- Examine the caulking around windows, doors, and other penetrations for cracks or gaps.
- Look for evidence of insect infestation, such as holes or tunnels in the siding.
- Inspect the flashing around windows, doors, and other penetrations for proper sealing.
- Check for loose or damaged fasteners.
- Assess the overall condition of the siding for signs of warping, buckling, or other structural issues.
- Examine the gutters and downspouts to ensure proper water drainage away from the foundation.
- Clean gutters and downspouts to prevent water damage.
- Note any areas requiring repair or replacement.
Addressing Common Problems
Insulated siding, while durable, is susceptible to damage from various sources. Understanding how to address these issues promptly and effectively will extend the life of your siding and maintain your home’s curb appeal. This section details common problems, their causes, and practical repair methods.
Minor Scratches and Dent Repair
Minor scratches and dents are often unavoidable. Fortunately, these imperfections are usually easily repaired. For shallow scratches on vinyl siding, a gentle cleaning with mild soap and water, followed by a thorough rinsing, is often sufficient. Deeper scratches might require the use of a vinyl repair kit, which typically includes colored caulk or putty that matches your siding’s color. Apply the caulk carefully, smoothing it out with a putty knife or your finger (wear gloves!), and allow it to dry completely before cleaning any excess. For dents, carefully applying heat with a hairdryer (keeping a safe distance to avoid melting the siding) can sometimes coax the dent back into shape. This method works best on relatively pliable siding materials.
Causes and Prevention of Water Damage
Water damage is a significant concern for insulated siding. Common causes include improper installation (allowing gaps or seams to form), damaged flashing around windows and doors, clogged gutters and downspouts leading to water runoff against the siding, and severe weather events. Prevention involves regular inspection of the siding for any gaps or cracks, ensuring proper flashing installation and maintenance, keeping gutters and downspouts clear of debris, and promptly addressing any visible signs of water damage. Consider installing gutter guards to minimize the need for frequent cleaning. Addressing issues like damaged caulking around windows and doors is crucial to prevent water intrusion.
Repairing or Replacing Damaged Siding Panels
More extensive damage, such as large cracks, significant dents, or holes, might necessitate panel replacement. The process generally involves carefully removing the damaged panel using a pry bar or utility knife, taking care not to damage adjacent panels. It’s important to purchase a replacement panel that precisely matches your existing siding in color and texture. Installation involves securing the new panel using appropriate fasteners, ensuring a tight and watertight fit. If you lack experience with home repairs, hiring a professional siding contractor is recommended for larger repairs or full replacements to ensure proper installation and prevent future problems.
Repairing a Small Hole in Vinyl Insulated Siding
A small hole in vinyl siding can be patched using a few simple steps. This repair is best suited for minor damage; larger holes require panel replacement.
- Clean the area around the hole thoroughly with soap and water, removing any dirt or debris. Allow it to dry completely.
- Choose a vinyl patching material that closely matches the color of your siding. Vinyl repair kits are readily available at home improvement stores.
- Apply a small amount of adhesive to the back of the patch. Follow the adhesive manufacturer’s instructions carefully.
- Press the patch firmly over the hole, ensuring complete contact. Use a putty knife or similar tool to smooth out any wrinkles or air bubbles.
- Allow the adhesive to cure completely, following the manufacturer’s instructions. This typically takes several hours.
- Once the adhesive is dry, inspect the repair for any imperfections. If necessary, carefully apply a small amount of matching caulk to seal any gaps and ensure a smooth finish.
Caulking and Sealant Maintenance
Proper caulking and sealant application are crucial for maintaining the integrity and longevity of your insulated siding. These materials act as a barrier against water intrusion, preventing damage to the underlying structure and insulation. Neglecting caulking can lead to costly repairs down the line, including rot, mold, and even structural issues. Regular inspection and timely replacement of damaged sealant are essential for preserving the energy efficiency and aesthetic appeal of your home’s exterior.
Inspecting and Replacing Damaged Caulking
Inspecting your caulking regularly is a simple yet effective preventative measure. Look for cracks, gaps, shrinking, or discoloration in the sealant around windows, doors, and seams in the siding. Pay close attention to areas exposed to harsh weather conditions. Damaged caulking should be removed completely before applying new sealant. This can be done using a utility knife, putty knife, or specialized caulking removal tool. Ensure all loose or deteriorated material is removed to provide a clean, sound surface for the new caulk. After removing the old caulk, clean the area thoroughly with a wire brush and a suitable solvent to remove any dust or debris.
Selecting Appropriate Sealants
Choosing the right sealant is vital for effective protection. Different siding materials require different types of sealants. For example, acrylic latex caulk is suitable for many applications, offering good flexibility and adhesion. Silicone caulk provides excellent water resistance and is often preferred for areas subject to constant moisture, such as around windows and doors. Butylic caulk offers superior adhesion and durability but is less flexible. Always check the manufacturer’s recommendations for compatibility with your specific siding material before making a selection. Consider the movement capabilities of the sealant; choosing a flexible caulk for areas that experience expansion and contraction due to temperature changes is crucial.
Applying Caulking to Prevent Water Intrusion
Proper application technique is just as important as selecting the right sealant. Before beginning, ensure the surface is clean, dry, and free from dust or debris. Cut the caulk tube at a 45-degree angle to create a smooth bead. Apply the caulk in a continuous, even bead, using a caulking gun. A smooth, consistent bead ensures complete coverage and prevents gaps where water can penetrate. Describe an image showing the proper technique for applying caulk to a seam, focusing on tool selection, caulk consistency, and smoothing techniques. The image would depict a person holding a caulking gun at a consistent angle, applying a smooth bead of caulk to a seam between two siding panels. The caulk gun itself would be ergonomically designed, and the caulk would be a consistent, sausage-like shape without gaps or bubbles. A caulking tool, such as a smoothing tool or a wet finger, would be shown gently smoothing the caulk to create a neat, finished appearance, ensuring that there are no gaps or irregularities. The image would also emphasize the importance of using a backer rod in wider gaps to minimize the amount of caulk needed and prevent sagging.
Winterization and Protection
Winter presents unique challenges for insulated siding, primarily due to the potential for ice and snow accumulation, as well as extreme temperature fluctuations. Proper preparation is crucial to prevent damage and ensure the longevity of your siding. Neglecting winter maintenance can lead to costly repairs down the line, including water damage, cracking, and even structural issues.
Protecting insulated siding during harsh winter conditions involves proactive measures to minimize the impact of freezing temperatures, snow, and ice. This includes both preventative steps taken before the onset of winter and regular inspections throughout the season to address any emerging problems promptly. The goal is to maintain the integrity of the siding’s insulation and prevent moisture intrusion, which can lead to significant damage.
Ice and Snow Prevention
Preventing ice and snow buildup is paramount to avoiding damage to your insulated siding. The weight of accumulated snow and ice can put considerable stress on the siding, potentially causing cracks or warping. Regular removal of snow and ice is essential, but it’s equally important to prevent their accumulation in the first place. Properly functioning gutters and downspouts are critical; they divert melting snow and ice away from the siding, preventing pooling and potential damage. Ensuring these systems are clear of debris is a key preventative measure. Furthermore, maintaining a safe distance between landscaping and the siding can improve air circulation and reduce the likelihood of ice dams forming at the roofline.
Preparing Insulated Siding for Winter
Preparing your insulated siding for winter involves a series of steps designed to protect it from the elements. This process typically begins with a thorough inspection of the siding, looking for any existing damage, loose panels, or gaps in caulking. Addressing these issues before winter sets in is crucial. Cleaning the siding to remove dirt, debris, and loose materials is also recommended. This allows for better adhesion of any protective coatings or sealants you might apply. Finally, inspecting and cleaning gutters and downspouts is essential to ensure proper water drainage, preventing ice dams and water damage to the siding.
Winter Maintenance Tasks
A proactive approach to winter maintenance will significantly extend the lifespan of your insulated siding. The following tasks should be incorporated into a regular winter maintenance schedule:
- Regularly inspect the siding for any signs of damage, such as cracks, loose panels, or water intrusion.
- Remove snow and ice accumulation from the siding carefully, avoiding the use of sharp tools that could scratch or damage the surface. Use a soft brush or broom.
- Check gutters and downspouts for clogs and ensure they are functioning properly to divert water away from the siding.
- Monitor for ice dams at the roofline, and take steps to prevent their formation, such as proper attic insulation and ventilation.
- Inspect caulking and sealant around windows and doors for any cracks or gaps, and repair as needed to prevent air and moisture infiltration.
Long-Term Care and Preservation
Proper long-term care significantly extends the lifespan of your insulated siding, maintaining its aesthetic appeal and protective qualities. By implementing proactive maintenance strategies, you can prevent costly repairs and ensure your home remains well-protected for years to come. This involves understanding the specific needs of your siding material and committing to a regular maintenance schedule.
Extending the life of your insulated siding relies on a combination of preventative measures and timely repairs. Regular cleaning removes dirt and debris that can trap moisture, leading to deterioration. Addressing minor damage promptly prevents larger, more expensive problems later. Furthermore, understanding the impact of environmental factors, such as extreme weather conditions, and taking appropriate protective measures will safeguard your investment.
Preventing Mold and Mildew Growth
Mold and mildew thrive in damp, shady environments. Regular cleaning and proper ventilation are crucial in preventing their growth on insulated siding. Cleaning should focus on removing any organic matter, such as leaves, bird droppings, and algae, which provide a food source for mold and mildew. Proper ventilation ensures that moisture doesn’t accumulate on the siding’s surface. For example, ensuring gutters and downspouts are clear and functioning correctly prevents water from pooling against the siding. In addition, choosing a siding material with inherent mildew resistance can further reduce the risk. Consider using a pressure washer (low pressure setting) for thorough cleaning, followed by a mild bleach solution (always following manufacturer instructions) for stubborn stains. After cleaning, allow the siding to dry completely.
Long-Term Maintenance Schedule
A well-defined maintenance schedule ensures proactive care and prevents problems from escalating. This schedule should include:
A comprehensive annual inspection is crucial. This involves checking for any signs of damage, such as cracks, dents, or loose panels. It also includes inspecting caulking and sealant around windows and doors for any signs of deterioration. Cleaning should be performed at least twice a year, more frequently in areas with heavy foliage or pollution. Caulking and sealant should be inspected and reapplied as needed, typically every 2-3 years. Repainting or recoating is generally recommended every 5-10 years, depending on the type of paint and environmental conditions. This timeframe can be shortened in harsh climates or areas with high humidity.
Cleaning Heavily Soiled Insulated Siding
Different methods exist for cleaning heavily soiled insulated siding, each with its advantages and disadvantages. Pressure washing offers a thorough cleaning but requires caution to avoid damaging the siding. Using a low-pressure setting and maintaining a safe distance are crucial. Alternatively, a soft brush and a solution of mild detergent and water can be used for a gentler approach. For stubborn stains, a solution of bleach and water (following manufacturer instructions carefully) can be effective, but it’s essential to rinse thoroughly afterward. For extremely persistent stains or mildew, professional cleaning services may be necessary. For example, a home situated near a busy road may require more frequent and intensive cleaning due to increased dirt and grime accumulation compared to a home in a rural setting.
Ultimate Conclusion
Maintaining insulated siding is a proactive approach to homeownership that yields significant long-term benefits. By implementing a consistent cleaning and inspection schedule, addressing minor issues promptly, and employing preventative measures, you can significantly extend the life of your siding and preserve your home’s value. Remember, a little preventative care goes a long way in protecting your investment and ensuring your home remains a beautiful and functional space for years to come. Regular maintenance isn’t just about aesthetics; it’s about safeguarding your property from costly repairs and ensuring lasting curb appeal.
