How to Install Insulated Siding
How to install insulated siding is a project that offers significant long-term benefits, from enhanced energy efficiency and reduced utility bills to increased home value and improved curb appeal. This guide provides a comprehensive step-by-step process, covering everything from selecting the right siding material to handling challenging installations and ensuring proper maintenance. We’ll explore various siding types, detail necessary tools and techniques, and address common obstacles to help you achieve a professional-looking, energy-efficient result.
Understanding the nuances of insulated siding installation is crucial for a successful outcome. This guide aims to equip you with the knowledge and confidence to tackle this home improvement project effectively. We’ll break down the process into manageable stages, offering clear instructions and helpful tips to navigate each step with ease. Whether you’re a seasoned DIY enthusiast or a first-timer, this guide will provide the necessary information to guide you through the entire process.
Types of Insulated Siding
Choosing the right insulated siding involves considering several factors, primarily material properties, cost, and longevity. Different materials offer varying levels of energy efficiency, durability, and aesthetic appeal. Understanding these differences is crucial for making an informed decision that best suits your home and budget.
Insulated Siding Materials
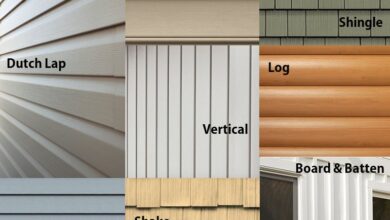
Insulated siding is available in a variety of materials, each with its own set of advantages and disadvantages. The most common types include vinyl, fiber cement, and foam-based siding. These materials differ significantly in terms of cost, lifespan, and energy efficiency, impacting both the initial investment and long-term maintenance.
Vinyl Insulated Siding
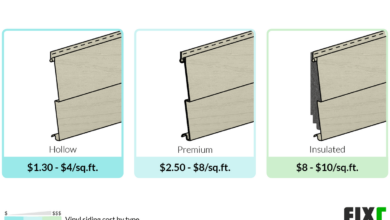
Vinyl insulated siding is a popular choice due to its affordability and ease of installation. It’s typically made from polyvinyl chloride (PVC) and features a foam insulation core. This core enhances its energy efficiency compared to non-insulated vinyl siding.
Fiber Cement Insulated Siding
Fiber cement siding, a composite material made from cement, cellulose fibers, and other additives, offers superior durability and fire resistance compared to vinyl. While more expensive than vinyl, its longer lifespan and resistance to damage often make it a worthwhile investment. Insulated fiber cement siding combines this robust exterior with a foam backing for enhanced energy efficiency.
Foam Insulated Siding
Foam insulated siding, often made from polyurethane or polyisocyanurate, boasts exceptional thermal performance. Its high R-value makes it a top choice for energy efficiency. However, it’s less durable than vinyl or fiber cement and may require more specialized installation. It’s also susceptible to damage from impact and UV exposure.
Comparison of Insulated Siding Materials
The following table summarizes the key differences between the three main types of insulated siding:
| Material | Cost (Approximate Range) | Lifespan (Years) | R-Value (Approximate Range) |
|---|---|---|---|
| Vinyl | $5-$15 per square foot | 20-40 | 3-5 |
| Fiber Cement | $10-$25 per square foot | 50-80 | 4-6 |
| Foam | $8-$20 per square foot | 20-30 | 6-8 |
Note: Costs are estimates and can vary significantly based on location, installer, and specific product features. R-values also vary depending on the thickness of the insulation layer. Lifespans represent typical ranges and can be affected by environmental factors and maintenance. For example, a coastal home might experience shorter lifespan for vinyl due to salt spray. Proper maintenance can extend the lifespan of any siding type.
Preparation Before Installation
Proper preparation is crucial for a successful insulated siding installation. Failing to adequately prepare the existing wall surface can lead to problems ranging from uneven siding to moisture damage and compromised insulation effectiveness. This section details the necessary tools, materials, and steps to ensure a smooth and long-lasting installation.
Necessary Tools and Equipment
Gathering the right tools beforehand streamlines the installation process and prevents delays. Having everything readily available ensures efficiency and a higher-quality finish.
- Measuring tape: A reliable measuring tape, preferably a long one (at least 25 feet), is essential for accurate measurements of the wall and siding panels.
- Level: A level is crucial for ensuring the siding is installed straight and plumb. Both a standard level and a laser level can be beneficial.
- Circular saw or hand saw: A circular saw with a fine-tooth blade is ideal for cutting siding panels quickly and cleanly. A hand saw can be used for more intricate cuts.
- Utility knife: A sharp utility knife is useful for trimming and detail work.
- Drill with assorted drill bits: A drill is needed for fastening the siding panels and potentially for pre-drilling pilot holes.
- Hammer: A claw hammer is helpful for various tasks, such as removing nails or securing fasteners.
- Safety glasses and gloves: Always prioritize safety by wearing appropriate personal protective equipment.
- Caulk gun: A caulk gun is used to apply sealant around windows, doors, and other areas requiring weatherproofing.
- Ladder: A sturdy ladder of appropriate height is necessary for reaching higher areas of the wall.
- Jigsaw: A jigsaw can be useful for cutting around corners and other complex shapes.
Preparing the Existing Wall Surface
Thorough preparation of the existing wall surface is paramount. This involves cleaning, repairing any damage, and applying a moisture barrier to protect the underlying structure and ensure the longevity of the new siding.
- Cleaning: Remove all loose paint, dirt, debris, and any other contaminants from the wall surface using a pressure washer or stiff brush. Ensure the surface is completely clean and dry before proceeding.
- Repairing Damage: Address any damaged areas, such as cracks, holes, or loose sections of existing siding or sheathing. Repair these using appropriate patching materials and techniques. This might involve filling holes with wood filler, replacing damaged sections of sheathing, or applying patching compounds.
- Applying Moisture Barrier: Install a moisture barrier, such as housewrap or waterproof membrane, over the cleaned and repaired wall surface. This barrier prevents moisture from penetrating the wall assembly and causing damage to the underlying structure. Overlap the seams and secure the barrier with staples or construction adhesive, ensuring a tight and continuous seal.
Measuring and Cutting Siding Panels
Accurate measurement and cutting are essential for a professional-looking installation. Improper cuts can lead to gaps, unevenness, and wasted material.
- Measure the wall sections: Carefully measure the height and width of each section of the wall where siding will be installed. Take multiple measurements to ensure accuracy.
- Transfer measurements to siding panels: Transfer the measured dimensions to the back of the insulated siding panels using a pencil. Mark the cutting lines clearly and precisely.
- Cut the siding panels: Use a circular saw or hand saw to carefully cut the siding panels along the marked lines. For intricate cuts or curves, a jigsaw may be more suitable. Ensure the cuts are clean and straight to avoid gaps or irregularities.
- Dry fit the panels: Before permanently fastening the panels, perform a dry fit to ensure proper alignment and fit. This allows for adjustments and corrections before the panels are fully installed.
Installation Process
Installing insulated siding involves a methodical approach to ensure a weathertight and aesthetically pleasing finish. Proper preparation, as discussed previously, is crucial for a successful installation. This section details the step-by-step process, focusing on techniques for achieving accurate alignment and secure fastening.
Installing the First Course of Insulated Siding
The first course sets the foundation for the entire installation. Precise alignment and secure fastening are paramount to prevent future issues. Improper installation of the first course can lead to misalignment throughout the project. Begin at a corner, using a J-channel or starting strip as a guide.
- Measuring and Cutting: Measure the length of the first course, accounting for any necessary cuts around windows or doors. Use a sharp utility knife or siding shears to cut the panel to the correct length. [Illustration: A close-up shot showing someone accurately measuring a piece of insulated siding with a measuring tape and then carefully cutting it with a utility knife. The cut is clean and precise.]
- Securing the First Panel: Slide the first panel into the J-channel or starting strip, ensuring it is flush against the building’s framing. Use appropriate fasteners (nails or screws) spaced according to manufacturer’s instructions. Start in the center and work your way outwards to prevent warping. [Illustration: A diagram showing the correct spacing of fasteners along the top and bottom edges of the first course of siding, highlighting the center-outward approach. The diagram also shows the siding panel neatly fitted into the J-channel.]
- Alignment and Leveling: Use a level to ensure the first course is perfectly horizontal. Make any necessary adjustments before securing the panel completely. This step is critical for maintaining a straight line throughout the entire siding installation. [Illustration: A picture depicting the use of a level to check the horizontal alignment of the first panel. The level is clearly visible, and the image emphasizes the importance of precise leveling.]
Installing Subsequent Courses of Siding
Once the first course is installed, subsequent courses follow a similar pattern, focusing on maintaining consistent overlap and alignment. Each course should overlap the previous one by the specified amount, usually indicated by the manufacturer.
- Overlapping and Alignment: Slide the next panel into place, ensuring the bottom edge overlaps the top edge of the previous course. Maintain consistent alignment using a level and straight edge. [Illustration: A view showing two courses of siding installed, clearly demonstrating the correct overlap and alignment. The image should highlight the even spacing and the smooth transition between the courses.]
- Fastening: Secure the panel using the appropriate fasteners, following the manufacturer’s recommended spacing. Pay attention to consistent spacing to avoid unevenness or warping. [Illustration: A close-up view of the fasteners being driven into the siding, showing the correct depth and spacing. The image clearly illustrates the use of a nail gun or screwdriver.]
- Corner and Trim Installation: Continue installing courses until the wall is complete. Corner pieces, J-channels, and other trim pieces should be installed as needed, following the manufacturer’s instructions for each specific piece. [Illustration: A photo of a finished corner detail, showcasing the proper installation of corner trim pieces. The image should highlight the neat and seamless transition around the corner.]
Installing Corner Pieces, J-Channels, and Other Trim Pieces
Corner pieces, J-channels, and other trim pieces provide a professional finish and protect the edges of the siding. Proper installation is essential for a weathertight seal and a visually appealing outcome.
- Corner Pieces: Corner pieces are designed to create a neat and weathertight finish at the corners of the building. They are typically installed before the siding panels, providing a channel for the siding to slide into. [Illustration: A detailed diagram showing the correct way to install a corner piece, including proper alignment and fastening.]
- J-Channels: J-channels provide a starting point for the siding and protect the edges around windows and doors. They are usually installed before the first course of siding. [Illustration: A photo showing the correct installation of J-channels around a window opening.]
- Other Trim Pieces: Various other trim pieces, such as fascia, soffit, and window trim, are installed according to manufacturer’s instructions and should be installed after the siding to ensure a professional finish. [Illustration: A photograph showing the completed installation of insulated siding, including various trim pieces around windows, doors, and corners.]
Dealing with Obstacles and Special Situations
Installing insulated siding around complex architectural features and uneven surfaces requires careful planning and execution. Proper techniques ensure a professional-looking finish and a durable, weatherproof exterior. This section details best practices for overcoming common installation challenges.
Installing Siding Around Windows and Doors
Proper installation around windows and doors is crucial for preventing water intrusion. Begin by installing flashing—a thin, waterproof metal sheet—over the window or door frame before applying any siding. This flashing should extend beyond the frame to create an overlap with the siding, ensuring water runs away from the opening. Next, measure and cut the siding pieces to fit snugly around the window or door frame. Use trim pieces, specifically designed for this purpose, to create a neat and weathertight seal. These trim pieces should be installed over the flashing and then the siding pieces, ensuring a smooth transition and a clean aesthetic. Caulk all seams and joints generously with a high-quality exterior-grade sealant, ensuring a complete waterproof barrier. Remember to follow the manufacturer’s instructions for your specific siding and flashing materials.
Working Around Corners and Other Architectural Features
Corners and other architectural features present unique challenges. For exterior corners, use corner trim designed to fit your siding. This trim not only provides a clean, finished look but also protects the edges of the siding from the elements. When working around complex shapes or projections, carefully measure and cut the siding to fit precisely. You may need to use multiple smaller pieces to conform to the contours of the surface. Use flexible caulk to seal all joints and ensure a watertight seal. For intricate details, consider using pre-fabricated trim pieces specifically designed for those architectural features. This method simplifies installation and guarantees a consistent, professional appearance.
Handling Uneven Wall Surfaces
Uneven wall surfaces can create significant installation challenges. Before installing siding, assess the extent of the unevenness. Minor imperfections can often be accommodated by using shims to create a consistent plane. Shims are small, wedge-shaped pieces of wood or plastic that are inserted between the wall and the siding to level the surface. For more significant unevenness, consider using furring strips—thin strips of wood attached to the wall—to create a level surface for the siding. This requires additional preparation but ensures a much more consistent and aesthetically pleasing finish. Always ensure that the entire wall surface is properly prepared and leveled before beginning the siding installation to prevent gaps and ensure a proper fit.
Ensuring a Watertight Seal Around All Openings and Joints
A watertight seal is paramount to the longevity and effectiveness of your insulated siding. Use a high-quality, exterior-grade caulk specifically designed for use with siding. Apply a generous bead of caulk to all seams, joints, and around any openings such as windows, doors, and vents. Pay particular attention to areas where the siding meets other building materials, such as trim or flashing. Ensure the caulk is properly smoothed and adheres to the surfaces to prevent cracking or gaps. Regularly check for any signs of cracking or deterioration and re-caulk as needed. Proper caulking is critical in preventing water damage and maintaining the structural integrity of your home’s exterior.
Finishing Touches and Maintenance
Properly finishing your insulated siding installation ensures longevity and aesthetic appeal. Overlooking these final steps can compromise the effectiveness of the insulation and leave your home vulnerable to the elements. Careful attention to detail now will save you headaches and potential costly repairs down the line.
Caulking and Sealing
After installing the siding panels, it’s crucial to seal all gaps and seams to prevent air and water infiltration. This involves applying a high-quality, exterior-grade caulk to any joints, cracks, or openings around windows, doors, and corners. Choose a caulk that is flexible and paintable to match the siding color. Apply a thin, even bead of caulk, smoothing it with a wet finger or a caulking tool. Allow the caulk to cure completely before painting. Pay particular attention to areas where the siding meets other building materials, such as trim or flashing. Proper caulking is essential for maintaining the building’s energy efficiency and preventing water damage.
Cleaning the Siding
Once the caulk has cured, thoroughly clean the entire siding surface. This removes any dust, debris, or excess caulk that may have accumulated during the installation process. A gentle pressure washer can be effective, but be careful not to damage the siding with excessive pressure. Start with a low pressure setting and increase gradually as needed. Always maintain a safe distance from the siding to avoid causing damage. Alternatively, a soft-bristled brush and a solution of mild detergent and water can be used for a gentler cleaning. Rinse thoroughly with clean water and allow the siding to dry completely. Regular cleaning prevents dirt and grime from building up and damaging the siding’s finish.
Insulated Siding Maintenance Schedule
A regular maintenance schedule will prolong the life of your insulated siding and keep your home looking its best. A yearly inspection and cleaning is recommended. This involves visually inspecting the siding for any signs of damage, such as cracks, dents, or loose panels. Clean the siding as described above, paying close attention to areas prone to dirt and debris accumulation, such as gutters and corners. Minor repairs, such as replacing damaged panels or recaulking seams, should be addressed promptly to prevent further damage.
Common Problems and Solutions
Several issues can arise with insulated siding. One common problem is water damage, often caused by improper caulking or damaged flashing. Regular inspections and prompt repairs are essential to prevent water from seeping behind the siding and causing rot or mold. Another issue can be warping or buckling of panels, which can be caused by extreme temperature fluctuations or improper installation. If panels become damaged or warped, they should be replaced as soon as possible. Finally, paint fading can occur over time, especially in areas with high sun exposure. Regular cleaning and repainting can help maintain the siding’s appearance and protect it from the elements.
Insulated Siding Inspection Checklist
A simple checklist can ensure thorough inspections:
- Inspect all seams and joints for cracks or gaps.
- Check for any signs of water damage, such as discoloration or swelling.
- Examine panels for cracks, dents, or warping.
- Assess the condition of caulking and sealants.
- Clean the siding thoroughly.
- Note any areas requiring repair or replacement.
Outcome Summary
Successfully installing insulated siding transforms your home’s exterior, enhancing both its aesthetic appeal and energy performance. By following the steps outlined in this guide, you’ll not only improve your home’s insulation and curb appeal but also gain valuable experience in home improvement. Remember to prioritize safety, meticulous preparation, and attention to detail throughout the process. With careful planning and execution, the rewards of a beautifully finished, energy-efficient exterior are well worth the effort.

